Dust #
du + rust = dust. Like du but more intuitive.
Why #
Because I want an easy way to see where my disk is being used.
Demo #
Install #
Cargo #
cargo install du-dust
🍺 Homebrew (Mac OS) #
brew install dust
🍺 Homebrew (Linux) #
brew tap tgotwig/linux-dust && brew install dust
Pacstall (Debian/Ubuntu) #
pacstall -I dust-bin
deb-get (Debian/Ubuntu) #
deb-get install du-dust
Windows: #
- Windows GNU version - works
- Windows MSVC - requires: VCRUNTIME140.dll
Download #
- Download Linux/Mac binary from Releases
- unzip file:
tar -xvf _downloaded_file.tar.gz - move file to executable path:
sudo mv dust /usr/local/bin/
Overview #
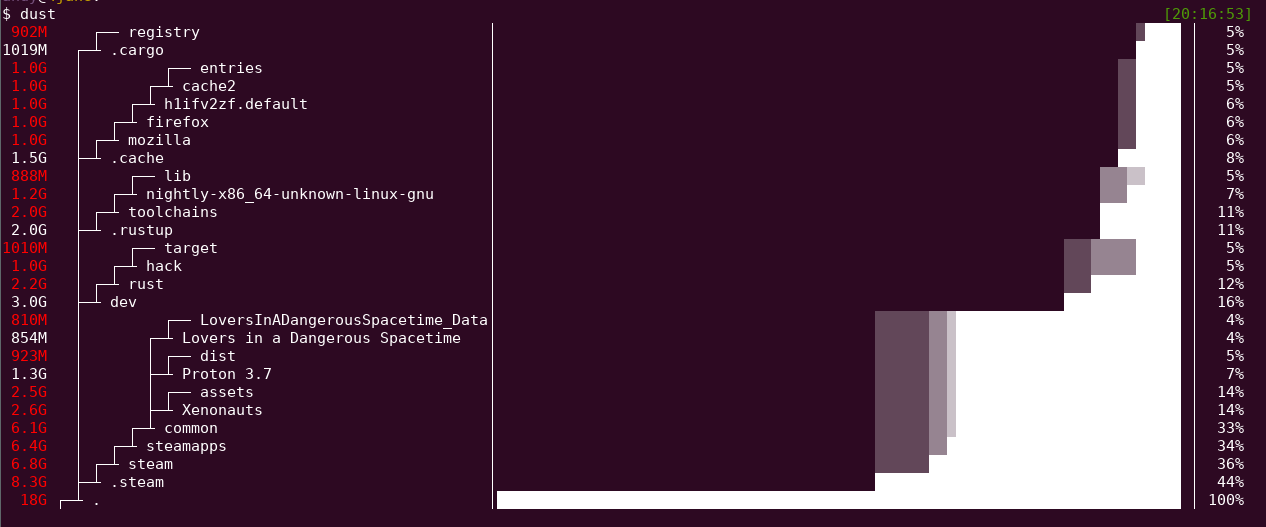
Dust is meant to give you an instant overview of which directories are using disk space without requiring sort or head. Dust will print a maximum of one ‘Did not have permissions message’.
Dust will list a slightly-less-than-the-terminal-height number of the biggest subdirectories or files and will smartly recurse down the tree to find the larger ones. There is no need for a ‘-d’ flag or a ‘-h’ flag. The largest subdirectories will be colored.
The different colors on the bars: These represent the combined tree hierarchy & disk usage. The shades of grey are used to indicate which parent folder a subfolder belongs to. For instance, look at the above screenshot. .steam is a folder taking 44% of the space. From the .steam bar is a light grey line that goes up. All these folders are inside .steam so if you delete .steam all that stuff will be gone too.
Usage #
Usage: dust
Usage: dust <dir>
Usage: dust <dir>  <another_dir> <and_more>
Usage: dust -p (full-path - Show fullpath of the subdirectories)
Usage: dust -s (apparent-size - shows the length of the file as opposed to the amount of disk space it uses)
Usage: dust -n 30  (Shows 30 directories instead of the default [default is terminal height])
Usage: dust -d 3  (Shows 3 levels of subdirectories)
Usage: dust -D (Show only directories (eg dust -D))
Usage: dust -F (Show only files - finds your largest files)
Usage: dust -r (reverse order of output)
Usage: dust -H (si print sizes in powers of 1000 instead of 1024)
Usage: dust -X ignore  (ignore all files and directories with the name 'ignore')
Usage: dust -x (Only show directories on the same filesystem)
Usage: dust -b (Do not show percentages or draw ASCII bars)
Usage: dust -i (Do not show hidden files)
Usage: dust -c (No colors [monochrome])
Usage: dust -f (Count files instead of diskspace)
Usage: dust -t (Group by filetype)
Usage: dust -z 10M (min-size, Only include files larger than 10M)
Usage: dust -e regex (Only include files matching this regex (eg dust -e "\.png$" would match png files))
Usage: dust -v regex (Exclude files matching this regex (eg dust -v "\.png$" would ignore png files))
Usage: dust -L (dereference-links - Treat sym links as directories and go into them)
Usage: dust -P (Disable the progress indicator)
Usage: dust -R (For screen readers. Removes bars/symbols. Adds new column: depth level. (May want to use -p for full path too))
Usage: dust --skip-total (No total row will be displayed)
Usage: dust -z 4000000 (Exclude files below size 4MB)
Alternatives #
- NCDU
- dutree
- dua
- pdu
- dirstat-rs
- du -d 1 -h | sort -h
Note: Apparent-size is calculated slightly differently in dust to gdu. In dust each hard link is counted as using file_length space. In gdu only the first entry is counted.